Dave and I headed out to Grimes county Saturday night for some practice. I wanted to try and image the entire Veil, so I took the 70-200mm lens again. Setting up went fairly smooth, but I had some issues with focus. I could never get below a FWHM of about 5 in the focus tool and I’m not sure if it was me, the wider view, the lens and associated focus ring, or what… but I went with the best I could manage. My stars always seem bloated or fuzzy and again, I don’t know if it’s me or my set-up. I did notice in processing that I clearly need to learn the toolset better in PixInsight (deconvolution, morphological transformation, TGVDenoise, ANCDR, ATrousWaveletTransform, etc). It felt great to have a nice and clear night out and to get some practice under my belt.
“The Veil Nebula is a cloud of heated and ionized gas and dust in the constellation Cygnus. It constitutes the visible portions of the Cygnus Loop, a large but relatively faint supernova remnant. The distance to the nebula is not precisely known, but Far Ultraviolet Spectroscopic Explorer (FUSE) data supports a distance of about 1,470 light-years. In modern usage, the names Veil Nebula, Cirrus Nebula, and Filamentary Nebula generally refer to all the visible structure of the remnant, or even to the entire loop itself. The structure is so large that several NGC numbers were assigned to various arcs of the nebula. There are three main visual components:
– The Western Veil (also known as Caldwell 34), consisting of NGC 6960 (the “Witch’s Broom”, “Finger of God”, or “Filamentary Nebula”) near the foreground star 52 Cygni;
– The Eastern Veil (also known as Caldwell 33), whose brightest area is NGC 6992, trailing off farther south into NGC 6995 and IC 1340; and
– Pickering’s Triangle (or Pickering’s Triangular Wisp), brightest at the north central edge of the loop, but visible in photographs continuing toward the central area of the loop. NGC 6974 and NGC 6979 are luminous knots in a fainter patch of nebulosity on the northern rim between NGC 6992 and Pickering’s Triangle.
The nebula was discovered on 1784 September 5 by William Herschel.”
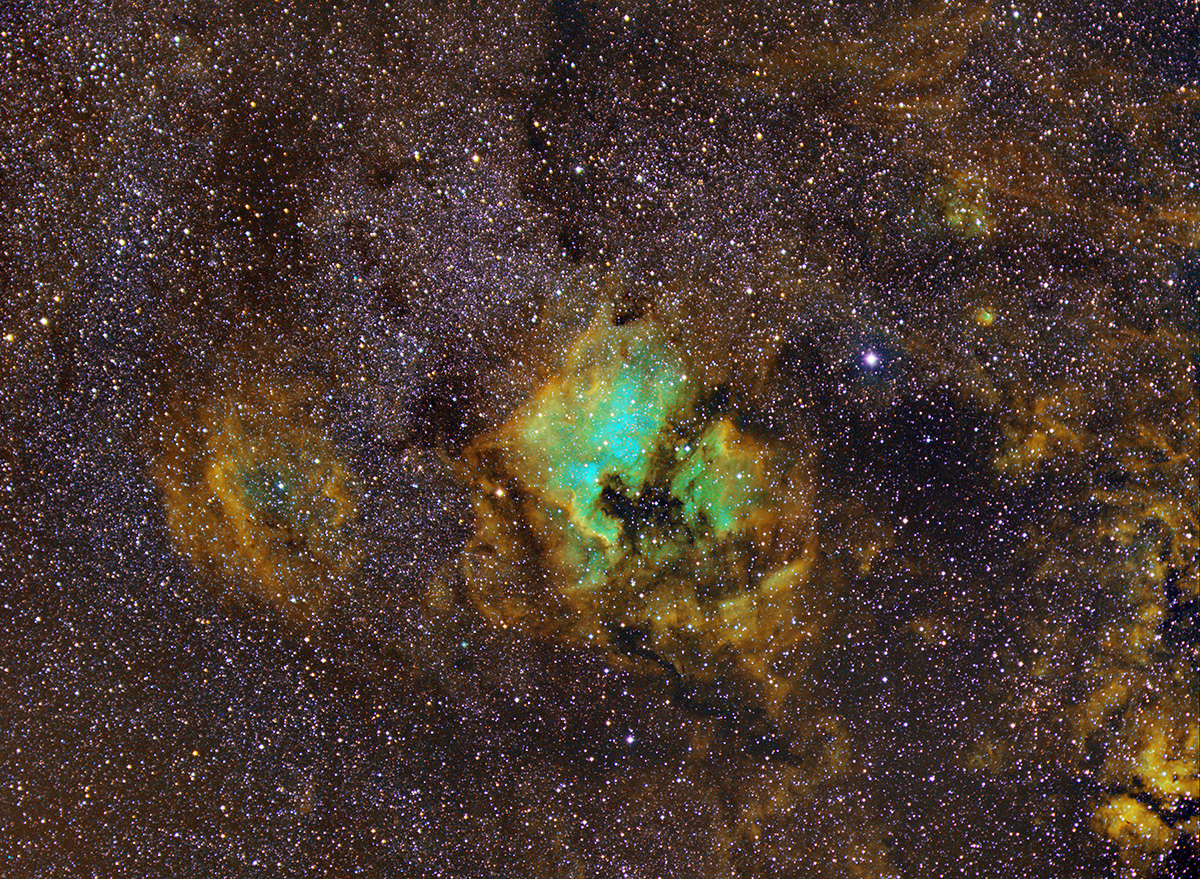
Although probably not the most mature decision, I couldn’t let the serendipitous alignment of crystal clear skies, cool weather, a new moon, and a weekend pass without maximizing the exploitation of said gooderies. I drove back to Huntsville last night and imaged the Cygnus region again. Specifically, it was NGC 7000, the North American Nebula and it was all wide-field. I had this grand plan to reconfigure the CCD with a directly attached plate to mount it with my fastest lens, the EF 85mm f/1.2L, and bin the narrowband exposures for some crazy signal to noise ratios. However, I had conveniently forgotten that the 85L focuser required power and could not be manually focused. Fortunately, I brought a back-up lens and albeit less sharp, the EF 70-200mm f/2.8L IS on the wide end was close to my desired field of view. I started out with a 2×2 binned Hydrogen Alpha, Sulfur II, and Oxygen III run and switched to a non-binned Luminance run after the meridian transit without consideration for the added difficulty of integration or the lack of need for Lum data when integrating NB. This is how we learn. Anyhoo, I didn’t get home until 6am and only got a couple of hours of sleep before I needed to be up and functional. It took some doing, but I managed to pull together a “first pass” at this data. I need to digest a little tribal knowledge before making another attempt. This is a lot more complex than I anticipated.
I’m on the fence about heading back out tonight for some wide-field imaging. I have this idea about going deep RGB on NGC7000, but not shooting full spectrum red at all. Shoot Ha for the red channel and standard green/blue all binned 2×2 and then shoot a luminance set binned 1×1 and see how that turns out. I think I could pull it off in one night because of the lens speed, but it’s a big effort to pack up and drive an hour+ each way a second night in a row.
Disappointed that I didn’t capture what I set out to last night, I was cold and done with time to wait while another imager was finishing his run of 15 minute subs, so I set up a short series of 5 minute luminance subs while we waited for our window to tear down. I registered those this morning and manually integrated them, then took an already integrated OSC data set from October of 2014 that I shot with a stock DSLR and converted both from linear to non-linear and did a simple LRGB combination folding the new lum data into the old color data. I didn’t do a color calibration or anything, so I’m certain there are far better ways to do this… I was just messing around and didn’t want to waste the data. It didn’t turn out half bad! Once I develop my post-processing Fu some more, I would like to have a catalog of “good” data that I can keep adding to over time.
It was a beautiful night last night. The sky was clear and dark (moon at 2%). Due to some power problems at Tranquility Base, Dave and I had to divert to the observatory in Huntsville. By the time we arrived, it was dark, so it was good to practice assembling my entire imaging rig almost entirely by touch. I had a little issue with balance due to using my older side-by-side saddle because I wanted the faster f/4 focal ratio of my camera lens versus my f/7 refracting telescope. The configuration is a little wonky and whether it works well or not depends greatly on where the target is in the sky relative to the meridian. This also impacts my star alignment routine because in order to get the parallel imaging element and guide element pointed the right way using the saddle, I have to rotate the equatorial mount head 90 degrees on the declination axis. I can’t prove this should cause an issue, but it seems to always give me trouble – so maybe it’s just me. The result is longer/multiple alignment passes and often missing targets on the slew stop. This happened last night. I was trying to locate NGC 6888 for my first bi-color narrow-band attempt. Cygnus was high in the sky and I felt really excited about having a solid imaging run ahead. The only problem was – I never found the target. After several hours of tinkering, I decided to just image where I was at and try another night for the Crescent. It wasn’t until I plate solved the result that I found I was somewhere very near IC 1318, the diffuse emission nebula surrounding Sadr (or Gamma Cygni). I was close, but the temperature was quite surprisingly dropping and I wanted at least something to practice with in post. I love being barefoot. Somehow I must have subliminally “forgotten” my shoes when I left the house and I also just-so-happened to be in my usual uniform of shorts and tee-shirt. When the temp bottomed out at 59 Fahrenheit, it was time to pack up and head home.
I went back out to the SHSU Observatory last night to take advantage of the clear skies and absence of moon. Instead of the EON 130mm APO, I decided to test out the SBIG Canon EF adapter on the STF-8300M and see how it worked out. I hadn’t balanced and shot with the side-by-side saddle in a long time, so there was some risk in making my already marginal tracking worse with a balance issue, but I was hoping the faster f/4 aperture of my EF 600mm f/4L IS lens would improve the amount of signal I could pack into a short night out. With AP, nothing goes exactly as you planned most of the time… and last night didn’t disappoint. The mystery fuzzy/focus/dew problem came back even though I had used the heat of the entire day to ensure I was synchronized with the ambient temperature. I tried modifying the set point cooling (again) thinking that might help, but it didn’t do much. Then, I had a eureka moment. I noticed that if I spun the FW8-8300 to the empty slot, I could image a relatively crisp starfield… but if I took sample shots on any other filter setting (R, G, B, LP, Ha, OIII, SII), I was in the fuzzies. It was the filters that were dewing out! (or so it seemed)… gah! Now what? Fortunately, Dave was there and had an extra long velcro dew strip that I wrapped around the protruding section of the FW8-8300 and cranked up on the max setting. After some time, that seemed to help. It will take another night of imaging to really test if this is “the fix” for dealing with the extreme Texas summer humidity. By the time I troubleshot and quasi-corrected the issue, it was after 11 and I’d lost a good chunk of my short night. Another silly mistake where I had not noticed a deselection of auto-save subs in TheSkyX caused me to lost about half an hour of great blue channel subs that I had to re-do. All said, I ended up staying later than I should have and didn’t get home, unpacked, showered, and in bed until 6:15. Sleep fast!
I really need some more practice. I am introducing a lot of noise in my workflow somewhere… or maybe it’s just in my data. I seem to lose star field color when I try to integrate Ha into the LaRGB. I get way desaturated combinations when combining luminance into RGB using only the Lum channel and weighting it and colors that are way over saturated if I use chrominance noise reduction in that step. I just used the LRGB tool here and skipped several steps of my old workflow because I am just not getting it. Maybe I need to sleep on it and come back with a fresh start. 🙂
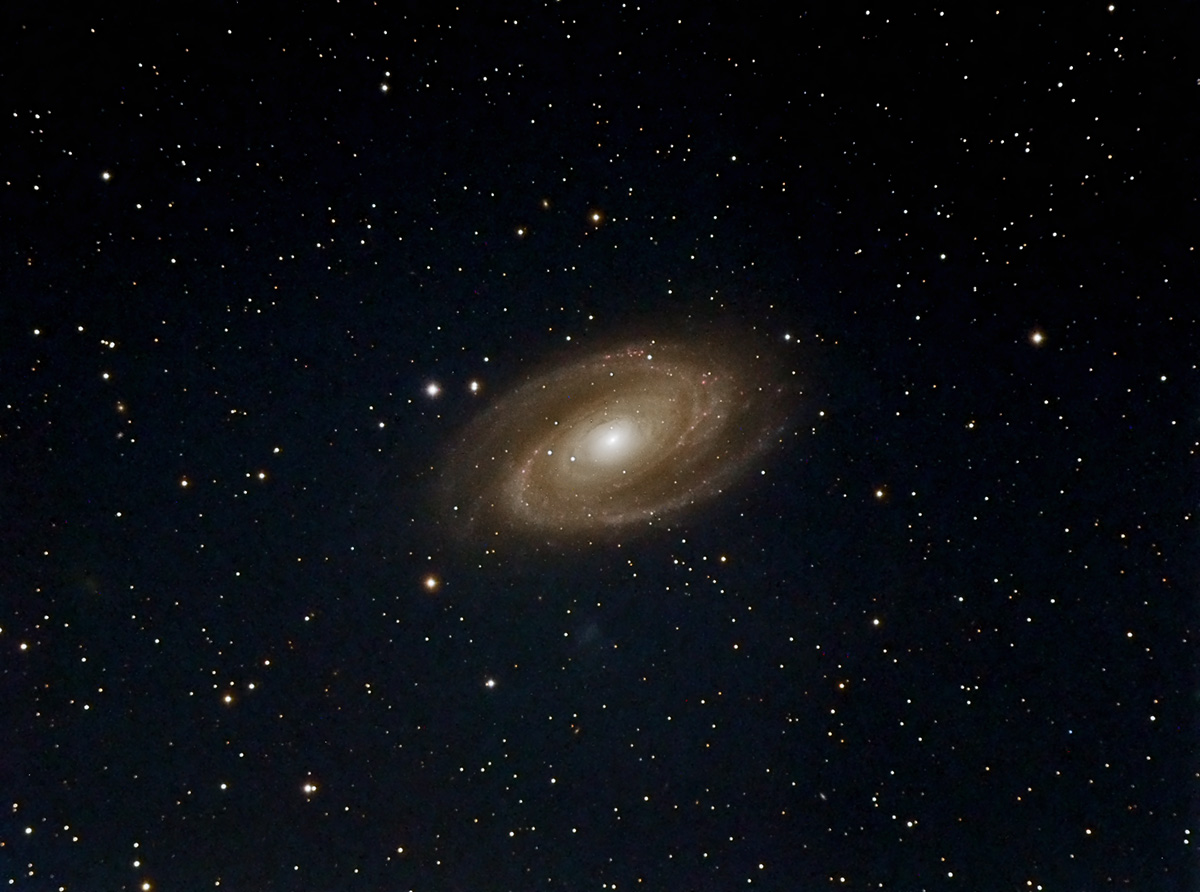
I noticed last time out (which was some time ago) that I was getting some blurry and out of focus images even after carefully adjusting focus and checking that I had no dew accumulation on the front element of my scope. I was almost done for the night, so I didn’t think too much of it, but it happened again tonight resulting in cutting the imaging session short. I didn’t get enough color data to add to this Pinwheel Galaxy, so I’ll have to go back for some more subs another night. I am guessing that the dew forming is somewhere between the rear element of the OTA and the CCD. I really am at a loss, but I’m sure some digging around on the Internet and/or forum queries will reveal the tribal knowledge I need to get past this speedbump. I tested out my first Bahtinov mask tonight – which worked great until my little dew situation. I think only about an hour of Luminance data was usable after ditching some fuzzy subs. I don’t know how to integrate less than three frames per channel in PixInsight (I think that is a limitation by design, but not sure), so I’ll have to do some more RGB on this target next night out. The learning curve on the SBIG is fun to climb, but a mentor would make things a lot smoother. 🙂
It has been a long 76 days since the last time I pointed a camera at the night sky. With the threat of possible rain later in the week, I decided to seize the opportunity last night to shake some rust off and get some practice under my belt. Only my second time out with the new monochromatic CCD, I was feeling the learning curve and ended up spending a lot more time on star alignment than I would have liked. The good news is, I remember going through a similar struggle when I started imaging with a DSLR off an equatorial mount too, so I’m sure this will pass with more practice. Another interesting challenge of using the CCD is the data acquisition time goes up by a factor of the number of channels you are integrating. To explain, on an OSC camera like a DSLR, your red, green, and blue channels are all captured at the same time. Let’s say you decide to capture an hour of data on a single target. To get “the same” hour of color data with a mono-CCD, you would need to capture an hour of red channel, and hour of green channel, and an hour of blue channel. There are a myriad of technical reasons to explain why those two images wouldn’t actually be the same, but for the purposes of illustrating time investment, you get the gist. The window between moonrise (1:17am) and when I finally was pseudo-focused and aligned wasn’t enough to really get what I needed on a target, so I just captured some Luminosity information on a well-known galaxy. I still struggle with focusing the CCD. Even with using TheSkyX focus tool and trying to be diligent and precise (visually) to get set up for an imaging run, I feel like the images are fuzzy or soft. I have questions like whether or not I need to refocus after changing filters and what is the best process for going about doing that without a RoboFocus. So the exciting part of the whole adventure was the location of the learning. Rather than drive an hour up to the HAAS (SHSU) Observatory in Huntsville or two hours to the Houston Astronomical Society Observatory in Columbus, I drove to the cul-de-sac in front of our new home location in Grimes county. There were a few active Chuck-will’s-widow, a Great Horned Owl, and various other critters weaving an ambient sound blanket under the stars. Depending on which LP map you reference, the area is yellow or green, but it is even still better than anything I see regularly where I currently live. I’m looking forward to being able to practice without the drive and to start accumulating some really deep data sets for creating (eventually) wall-hangers.
So here is the exact same data set of M81… dew and all. With the help of some kind folks over at the Cloudy Nights forums, I was able to reprocess with a little better results. I have a lot of work to do, but I’m really excited about getting out and capturing some better data to practice on… practice, practice, practice.
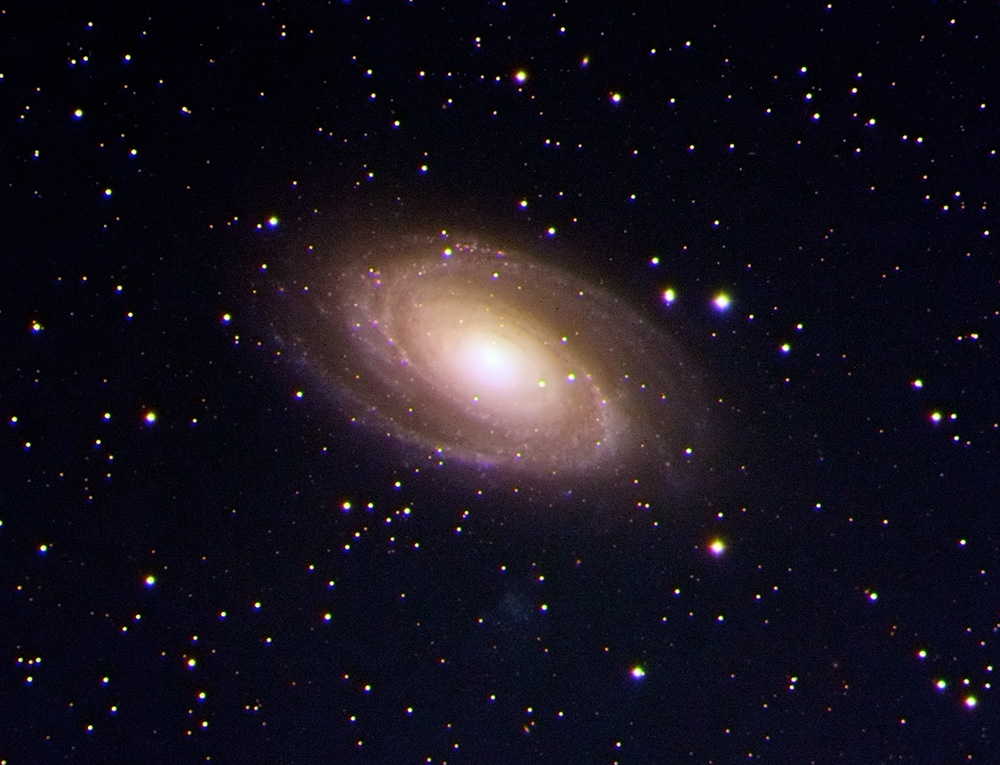
It’s been a few months since I’ve imaged anything. There are a number of factors that play into that unfortunately fact, but the main one has been weather. I believe last night was literally the first cloudless night without rain in nearly four weeks. I had ordered a monochromatic CCD back in October that took some time to fulfill and the camera (with accessories) arrived just when the poor weather hit. Coincidence? 🙂 On a brighter note, this allowed me to figure out I should purchase a new laptop, install all my AP software, and check connectivity and camera control from my dry desk indoors before spending a night in the field. This entire shift away from my unmodded, Bayered, one-shot-color DSLR to a set-point cooled, mono CCD is quite the endeavor for me. It not only requires new workflow in both image acquisition (per-channel imaging with potential for narrowband) and processing (drastically different integrations and post processing sequence), but it also has introduced new software since my user-friendly and intuitive BYEOS doesn’t work with the CCD. I decided to go with the STF-8300M from Santa Barbara Instruments Group. Part of the decision was based around great “bang for the buck” in capability and features, but mostly it was based on reputation and proven track record as being a “work horse” in the field. There were/are newer and improved models, but I really felt this would serve me well as a first dedicated AP camera. So, back to last night… I arrived at the Observatory around 6pm with plenty of time to set up all my gear and get things balanced. As soon as Polaris was bright enough for my amateur seeingballs to make out, I quickly did a polar alignment and waited for enough high mag stars to facilitate a 3-star alignment. This is where the fun began. First off, I had no idea how to do an alignment with the CCD. In the past, I used Live View on the DSLR and more or less treated it like an eyepiece of sorts. In lieu of this, I used the focusing tool in TheSkyX’s camera plug-in (what I’ve decided to use for now) and attempted to align. I botched the first alignment and couldn’t get on target, so I started over from scratch and used a handheld 520nm laser to aid in locating my position when off at each step. The second time around, I got the alignment spot on and was quite happy except for the fact that the entire process had taken well over an hour… but I learned a lot for the next time around. I decided to shoot Bode’s Galaxy since that was the first DSO I ever attempted when I started this hobby about 10 or 11 months ago. Since everything was new, I had no idea how long to shoot each sub or how many subs would be sufficient. I mean, more is always better, but I had no reference point. I decided, which more or less was just a complete guess, to shoot 10 Luminance subs binned 1×1 and 5 each Red, Green, and Blue subs binned 2×2. At the end, I also shot 5 Hydrogen-Alpha subs binned 1×1, but ended up not using them for now. I have so many questions. Anyhoo, the night could be summed up in two words… cold and wet. The temp dropped dramatically after sunset and the air was thick with moisture. We are coming off a month of rainy and dreary days, so there was no shortage of dew forming on every surface imaginable. I had my dew heaters on 100% power from the moment I thought they were holding up well, but when I looked at my data this morning, it is clear that the dew won. I also had “checked” my focus in between each channel run, but apparently not well enough. I can’t tell if focus had drifted or if the star bloat is from dew. I am leaning toward the latter because of the chromatic artifacts that shouldn’t be there from anything in the optical path. The registration/calibration and integration workflow in PixInsight is very different when starting with individual channels. There were a lot of challenges with this bad set of data I managed to bunch up last night. The first thing I noticed was the challenge of integration of linear versus non-linear data. I am not quite sure where you have to have transformed the histogram to non-linear before combines and where you can get away with linear data. The second thing I noticed (other than the focus/dew problems) was that I seemed to have a ton of hot-pixel looking noise for the color channels, but not for the luminance channel after registering and integrating the subs. The only thing I can think of that would be different is that I changed the binning to 2×2 for the RGB channels. Since binning down should improve signal to noise, I am not sure I get why I introduced this artifact… or if that is even what it is at this point. Of all the “schtuff” that came up along the way, this question is the most pressing on my mind. I’m sure my inability to leverage the Hydrogen-Alpha data will get solved with experience in processing. Which was the third baffle… I could not get PixelMath to map the Ha data into the LRGB data. I honestly don’t know if it is my integrated subs, if I input wrong wavelength filter bandwidth in the expression, or if there was some mumbo-jumbo going on with linear versus non-linear working spaces. There was also the star-mapping step to upsample the RGB channels to match the Luminance for the LRGB combination, so I used the same star-mapping method on just the Red channel for the PixelMath operation and that might have jacked something up. I really don’t know, so I just shelved the Ha data for now. In retrospect, I probably won’t shoot a separated Luminance channel next target. I’ll just shoot RGB unbinned. I’m also going to try to find some public domain data sets to practice the integration steps on better quality data. The fact that I got dewed out is disheartening because I don’t know how to beat it. I suppose I could double up on the heater strips and take a hair dryer with me to zap the front element of the OTA every couple of subs. Overall, it was a good “first light” on the gear. I learned a lot about the minor steps that will save me time the next time around. I learned a few areas I need to be more meticulous about checking throughout the imaging run. It’s easy to get bummed out with poor results like this, but when I look back to last May and what I’ve learned, I’m really excited to see where my images will be with another 10 months of practice.